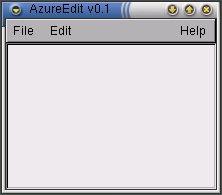
This is the main window so far.
This is a first attempt at writing a tutorial for Azure. It is split into two parts, an XML tutorial and a API reference. This tutorial covers the creation of a sample application, a very basic text editor, given the name AzureEdit. This is not a real program, just a teaching aid.
This tutorial will not cover the loading and saving of the text files. Also, the completeness of this tutorial is dependant on the completeness of the library. As the library becomes more mature, expect to see this tutorial advance as well.
Azure documents begin as every XML document does, with a XML version tag. Immediately following that, there is the DOCTYPE tag.
<?xml version="1.0"?>
<!DOCTYPE gui SYSTEM "gui.dtd">
Next, as per the XML standard, come the gui tag. Within this tag, valid Azure documents contain one or more window or widgetProto tags. Explanations for the widgetProto tags will follow shortly, but the window tags should be fairly self explanatory. Window tags contain an optional menuBar tag followed by one widget tag. Most widgets can contain one or more child widgets, and some widgets, in particular the label and radioButton widgets, can contain text (or parsed charachter data, in XML parlance). These are called container widgets, and some widgets, like boxes, are abstract container widgets with no graphical representation, while others, like frames and buttons, have a nonabstract graphical representation.
A description of the widgetProto tag is probably in order. widgetProto is short for widget prototype, and it is a hierarchy of widgets with a named type. Every new type of widget prototype declared can be instatiated zero or more times with an arbitrary named container widget as the parent. This is most commonly employed to declare the interface for dialog boxes without actually creating them. When the dialog box should be created, a call can be made in C++ or XML to instatiate the window.
So, continuing with the tutorial, the next segment of the text editor Azure file would probably be as follows, which is a definition of the main window of the hypothetical AzureEdit.
<gui app="textEdit">
  <window title="AzureEdit v0.1">
The gui tag should include the app attribute, so that Azure documents designed for a single application stored in some shared location can be sanity checked. After all, the app attribute should only match a single application name. Within that, for this example, comes the window tag. This tag has the required attribute title, which should be self explanitory. In order to be useful bto the user, the text editor needs some way to expose it's functionality without taking up too much of the screen real estate. The canonical insturment to expose this functionality is the menubar. In Gtk, Motif, Windows and many other toolkits, this menubar is contained in the window, so it is defined immediatly after the window tag, if it is defined at all. The menuBar begins a menu definition.
    <menuBar>
      <menuItem label="File">
        <subMenu>
	  <menuItem label="New" />
	  <menuItem label="Open" />
	  <menuItem label="Save" />
	  <menuBreak />
	  <menuItem label="Quit" />
	</subMenu>
      </menuItem>
      <menuItem label="Edit">
        <subMenu>
	  <menuItem label="Cut" />
	  <menuItem label="Copy" />
	  <menuItem label="Paste" />
	  <menuBreak />
	  <menuItem label="Search">
	    <subMenu>
  	      <menuItem label="Forwards" />
	      <menuItem label="Backwards" />
	    </subMenu>
	  </menuItem>
	</subMenu>
      </menuItem>
      <menuItem label="Help" rightJustified="true">
        <subMenu>
	  <menuItem label="Contents" />
	  <menuItem label="Web site" />
	  <menuBreak />
	  <menuItem label="About" />
	</subMenu>
      </menuItem>
    </menuBar>
After the menuBar tag the following code should be inserted.
  </window>
</gui>
After this comes a text tag. This tag cannot contain anything. The text tag should take no explanation. The rest may not be so self evident. The outermost tag is the menuBar tag, which is the horizontal container for the menu. Within that is a collection of one or more menuItem tags, which have the label from the attribute label. menuItem tags can be contain a subMenu tag or they may be empty. subMenu tags are much like menuBar tags, in that they contain one or more menuItem tags.
This is the main window so far.
The next step in building this application is giving it the ability to respond to user actions. User actions generate events, which have handlers that activate in response to the events. A trivial example of an event is a button press. Every time the user manipulates the mouse and keyboard to activate the button, the event is generated, which is handled by a named event handler. An example with AzureEdit may explain this better. The following changes need to be made to the "Quit" menu item underneath the "File" menu.
<menuItem label="Quit" name="file quit" handler="main window close" />
For Azure widgets, only one event can be generated at the current time. Azure windows, for example, generate an event when they are deleted. Also, Azure widgets need to be named for them to create events. Widgets are named, as the above example makes clear, via the name attribute. For the above example, the main window, now named "main window," will execute the "main window close" event whenever the user tries to close it via the 'X' button in the upper right corner of the window decoration. This event can be reused by other widgets, for example the "Quit" menu item under the "File" menu item in the menu bar.
In order to write event handlers, two approaches are available. The first is the most conventional, and most difficult, is to use C++ as the event handler language. This is completely flexible, but the sub-classing system has a fair amount of code overhead to implement. Since part two covers the C++ API, this section will focus on the other method, using XML to create the handlers.
Earlier in this document, the contents of the gui tag was listed as one or more window or widgetProto tags. The window and widgetProto tags are not the only legal contents of the gui tag. Also legal is the handler tag, which defines basic actions to take before the C++ handlers are called. These actions are completely limited to GUI modifing actions. For example, a button can be connected to a handler which displays a dialog box from a widgetProto.
Since the destruction of a window does not automatically quit the application, since most applications have more than one window. However, since AzureEdit has one and only one window, it is smart to connect it to a handler that quits the application. The following code should be added after the closing window tag, and before the closing gui tag.
  </window>

  <handler name="main window close">
    <quit />
  </handler>
</gui>
So, whenever the main window is destroyed, the entire application will quit. There are a number of other actions that a handler can take. Every action besides the quit action takes at least the name of the widget to operate on. Some take another argument. Tags exist which destroy, hide, show, activate, or deactivate a named widget. All of these actions take only a required name attribute, which names the object of the action. Handlers can execute another action, which requires two arguments, and creates an instance of a widget prototype. The first is the name of the widgetProto, and the other is the name of the widget which is to be the parent of the newly created widget. If the widgetProto only contains a window, the createWindow action tag should be used.
Since most of the handler actions are self explanitory, the tutorial will continue only by adding support for creation and destruction actions. Since most applications prompt for confirmation before quiting, AzureEdit should too. The following code may be a little confusing (or not), as it introduces a number of tags.
The new tail end of the file:
  </window>

  <widgetProto name="quit prompt">
    <window name="confirm dialog" title="Confirm AzureEdit Quit">
      <box alignment="vertical">
        <label>Would you like to save your changes?</label>
        <separator alignment="horizontal" />
	<box alignment="horizontal">
	  <button name="confirm yes" handler="confirm yes">
	    <label>Yes</label>
	  </button>
	  <button name="confirm no" handler="quit">
	    <label>No</label>
	  </button>
	  <button name="confirm cancel" handler="destroy confirm">
	    <label>Cancel</label>
	  </button>
	</box>
      </box>
    </window>
  </widgetProto>

  <handler name="destroy confirm">
    <delete name="confirm dialog" />
  </handler>

  <handler name="quit">
    <quit />
  </handler>

  <handler name="main window close">
    <createWindow name="quit prompt" />
  </handler>

</gui>

This is the close confirmation dialog box.
This is the complete file so far.
Basically, the handler for deleting the main window just shows a quit confirmation dialog box, rather than just quitting. This dialog box is described in the widgetProto named "quit prompt". The dialog box is described, but not created until the "main window close" event is triggered. The "Yes" and "No" buttons in the confirmation dialog box have their own handlers. The "Yes" button triggers the "confirm quit" event, while the "No" button triggers the "quit" event. The "cancel" destorys the dialog box, cancelling the quit action.
The widgetProto named "quit prompt" contains the contents of the confirmation dialog box. It contains a window, which we have already seen. Unlike the main window, the confirmation dialog box does not contain a menubar, it only has the box child widget. A box is just a one dimensional collection of widgets, and it can created as either vertical or horizontal by specifying "vertical" or "horizontal" in the alignment attribute. This box contains a label, which contains the text of the label. After the box is the horizontal separator, which is made with a separator tag, and takes the same alignment attribute a box takes. Next comes the horizontal box to hold the buttons. It is just like the outermost box, except it's alignment is horizontal, not vertical. Each button is also a container for exactly one child widget, although only a label child really makes any sense.
In order to save the text, a C++ handler must be used, which brings this tutorial to it's next section.
First, some information about building a Azure application under UNIX. If Azure was installed correctly, the azure-config script should be in the path. This script can be run without any arguments to get a summary of it's usage, but only two options are really useful. This first is the cflags argument. It is specified with the following command:
$ azure-config --cflags
This outputs all of the information needed to compile an Azure program. Simmilarly, the libs option produces simmilar options for linking the program. These should be specified in the compiler command line with backticks. An example might be explanatory. Assume the source file is named test-azure.cc. This is the command to compile and execute it in one step:
$ gcc -o test-azure test-azure.cc `azure-config --cflags --libs`
Make sure that the quotes surrounding the azure-config are backticks. If you don't know what a backtick is, it is probably the in the upper right corner of the keyboard, right above the tab key.
As you can see, you can spefify more than one option at a time, although most combinations don't make a great deal of sense. For any examples in this or other documents, the above command line can be used to try them out. The filenames should be updates, however, to whatever is approriate for the example.